IIS配置MP4格式MIME类型终极指南

一、血泪故事会:为什么你的视频播不了?

昨天隔壁工位老王的旅游网站突然被客户投诉,所有风光展示视频都变成「白屏黑洞」。最后发现是IIS把.mp4文件当成二进制流推给浏览器,导致视频无法解析。今天我们就用5分钟根治这个顽疾!(╯‵□′)╯︵┻━┻


二、MIME类型急救知识包

1. 什么是MIME类型?

就像文件身份证,告诉浏览器「我是谁,该怎么打开」。当IIS遇到不认识的文件类型时,会默认使用application/octet-stream(二进制流),这就是视频无法播放的元凶!

2. MP4的正确打开方式

  • ​正确姿势:video/mp4(推荐!浏览器自动调用播放器)
  • ​备胎方案:application/mp4(部分老系统兼容)
  • ​错误示范:application/octet-stream(默认导致播放失败的罪魁祸首)

📌 行业冷知识:根据RFC 4337标准,MP4官方MIME类型是video/mp4


三、图形界面配置四步曲(附灵魂图解)

步骤1:召唤IIS管理器

Win + R 输入inetmgr,就像打开阿拉丁神灯一样~

步骤2:定位MIME设置
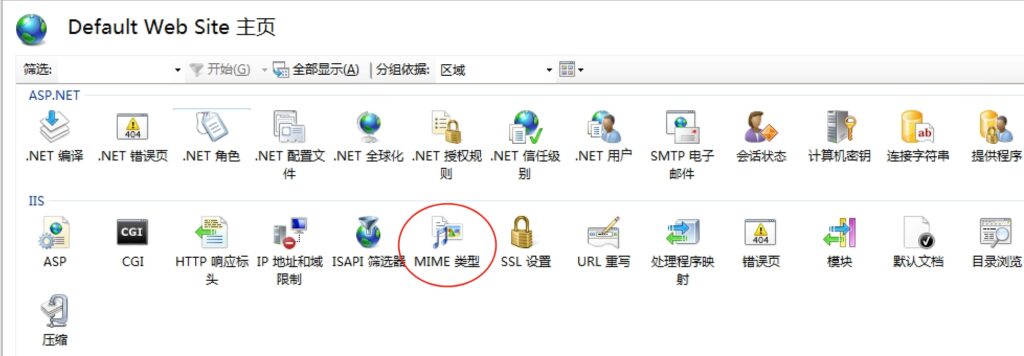
步骤3:添加新条目

点击右侧【添加】按钮,填写魔法参数:

文件扩展名: .mp4
MIME类型: video/mp4

步骤4:重启大法好

操作完成后一定要右键选择【重新启动】站点,就像给服务器做心肺复苏!


四、命令行高手模式(批量部署必备)

# 添加MP4类型
Add-WebConfigurationProperty -pspath 'MACHINE/WEBROOT/APPHOST' -filter "system.webServer/staticContent" -name "." -value @{fileExtension='.mp4';mimeType='video/mp4'}

# 立即生效咒语
iisreset /noforce

五、疑难杂症急诊室

症状1:配置后仍然无法播放

  • 检查清单:
    • 清除浏览器缓存(Ctrl + Shift + Del)
    • 检查文件权限(右键文件→属性→安全)
    • 查看HTTP响应头(F12开发者工具)

症状2:服务器报404错误

<!-- 在web.config中加入 -->
<system.webServer>
  <staticContent>
    <remove fileExtension=".mp4" />
    <mimeMap fileExtension=".mp4" mimeType="video/mp4" />
  </staticContent>
</system.webServer>

六、安全加固小课堂

危险操作预警!

⚠️ 不要图省事添加<mimeMap fileExtension=".*" ... />,这相当于给黑客开后门!

推荐白名单策略

<staticContent>
  <mimeMap fileExtension=".mp4" mimeType="video/mp4" />
  <mimeMap fileExtension=".webm" mimeType="video/webm" />
  <!-- 显式声明允许的视频格式 -->
</staticContent>

七、跨版本兼容指南

IIS版本特殊说明
IIS 7.x需要安装静态内容模块
IIS 8+原生支持H.264编码
IIS 10支持HTTP/2视频流

🎯 实战演练:访问你的视频地址,用https://tools.keycdn.com/curl检查MIME类型是否显示为video/mp4,看到绿色的正确标识就可以开香槟啦!🍾

如果还有任何悬案未破,欢迎在评论区召唤技术支援小队! (•̀ᴗ•́)و ̑̑

jquery easyui datagrid 全选、反选、清除

//全选
function allselectRow(tableName) {
    $('#' + tableName).datagrid('selectAll');
}
//反选
function unselectRow(tableName) {
    var s_rows = $.map($('#' + tableName).datagrid('getSelections'),
            function(n) {
                return $('#' + tableName).datagrid('getRowIndex', n);
            });
    $('#' + tableName).datagrid('selectAll');
    $.each(s_rows, function(i, n) {
        $('#' + tableName).datagrid('unselectRow', n);
    });
}
//全清
function clearSelections(tableName) {
    $('#' + tableName).datagrid('clearSelections');
}
var grid = $('#tt1');
        var options = grid.datagrid('getPager').data("pagination").options;
        //当前页数
        var currentPage = options.pageNumber;
        //总条数
        var total = options.total;
        //当前页记录数
        var rows = options.pageSize;
        //总页数
        var max = Math.ceil(total / options.pageSize);


//全选选择
function checkAll() {
    $("input[name='menuid']").each(function() {
        $(this).attr("checked", true);
    });
};
//反向选择
function reversal() {
    $("input[name='menuid']").each(function() {
        $(this).attr("checked", !this.checked);
    });
}
//取消选择
function clearCheck() {
    $("input[name='menuid']").each(function() {
        $(this).attr("checked", false);
    });

PHP日志类

新建Log.class.php,复制以下代码放入其中:

<?php
interface ILogHandler {
    public function write($msg);
}

// PHP日志类
class CLogFileHandler implements ILogHandler {
    private $handle = null;

    public function __construct($file = '') {
        $this->handle = fopen($file, 'a');
    }

    public function write($msg) {
        fwrite($this->handle, $msg, 4096);
    }

    public function __destruct() {
        fclose($this->handle);
    }
}
class Log {
    private $handler = null;
    private $level = 15;

    private static $instance = null;

    private function __construct() {
    }
    private function __clone() {
    }

    public static function Init($handler = null, $level = 15) {
        if (!self::$instance instanceof self) {
            self::$instance = new self();
            self::$instance->__setHandle($handler);
            self::$instance->__setLevel($level);
        }
        return self::$instance;
    }


    private function __setHandle($handler) {
        $this->handler = $handler;
    }

    private function __setLevel($level) {
        $this->level = $level;
    }

    public static function DEBUG($msg) {
        self::$instance->write(1, $msg);
    }

    public static function WARN($msg) {
        self::$instance->write(4, $msg);
    }

    public static function ERROR($msg) {
        $debugInfo = debug_backtrace();
        $stack = "[";
        foreach ($debugInfo as $key => $val) {
            if (array_key_exists("file", $val)) {
                $stack .= ",file:" . $val["file"];
            }
            if (array_key_exists("line", $val)) {
                $stack .= ",line:" . $val["line"];
            }
            if (array_key_exists("function", $val)) {
                $stack .= ",function:" . $val["function"];
            }
        }
        $stack .= "]";
        self::$instance->write(8, $stack . $msg);
    }

    public static function INFO($msg) {
        self::$instance->write(2, $msg);
    }

    private function getLevelStr($level) {
        switch ($level) {
            case 1:
                return 'debug';
                break;
            case 2:
                return 'info';
                break;
            case 4:
                return 'warn';
                break;
            case 8:
                return 'error';
                break;
            default:
        }
    }

    protected function write($level, $msg) {
        if (($level & $this->level) == $level) {
            $msg = '[' . date('Y-m-d H:i:s') . '][' . $this->getLevelStr($level) . '] ' . $msg . "\n";
            $this->handler->write($msg);
        }
    }
}

调用方式:

<?php
require 'Log.class.php'; // 导入日志类文件
define('DS', DIRECTORY_SEPARATOR); // 设置目录分隔符
define('LOG_PATH', dirname(__FILE__) . DS . 'log' . DS); // 日志文件目录

$logHandler = new CLogFileHandler(LOG_PATH . date('Y-m-d') . '.log');
$log = Log::Init($logHandler, 15);

Log::DEBUG('111111');

centos 编译安装apache httpd

wget http://mirror.bit.edu.cn/apache/httpd/httpd-2.4.39.tar.gz
wget http://mirror.bit.edu.cn/apache/apr/apr-1.7.0.tar.gz
wget http://mirror.bit.edu.cn/apache/apr/apr-util-1.6.1.tar.gz

解压缩:

tar -xvf httpd-2.4.39.tar.gz
tar -xvf apr-1.7.0.tar.gz
tar -xvf apr-util-1.6.1.tar.gz

一点文件操作:

mv apr-1.7.0 httpd-2.4.39/srclib/apr
mv apr-util-1.6.1 httpd-2.4.39/srclib/apr-util
cd httpd-2.4.39

编译前安装 :

yum -y install gcc make zlib-devel pcre-devel expat-devel

mkdir /web

mkdir /web/httpd

mkdir  /web/php

编译命令:

./configure --prefix=/web/httpd --with-included-apr --enable-nonportable-atomics=yes --with-z

编译完成后:

make

make install

service httpd start

ASP.NET CORE中的IOC注册类的三种方式

AddSingleton():

When we use the AddSingleton() method to register a service, then it will create a singleton service. It means a single instance of that service is created and that singleton instance is shared among all the components of the application that require it. That singleton service is created when we requested for the first time.

AddScoped():

Scoped means instance per request. When we use the AddScoped() method to register a service, then it will create a Scoped service. It means, an instance of the service is created once per each HTTP request and uses that instance in other calls of the same request.

AddTransient():

When we use the AddTransient() method to register a service, then it will create a Transient service. It means a new instance of the specified service is created each time when it is requested and they are never shared.

Note: In the real-time applications, you need to register the components such as application-wide configuration as Singleton. The Database access classes like Entity Framework contexts are recommended to be registered as Scoped so that the connection can be re-used. If you want to run anything in parallel then it is better to register the component as Transient.


Singleton:每次获取的时候,都是同一个实例,相当于静态类

生命周期:项目启动——项目关闭

AddSingleton可以直接用圆括号添加一个实例

Transient: 每次从容器中获取的时候,都是一个新的实例

生命周期:GC回收,主动释放

Scoped: 对象在请求是才开始创建,在这次请求中获取的对象都是同一个

生命周期:请求开始——请求结束

scoped在同一次请求中,获取多次对象得到的是同一个对象

对于同一个接口的多个实现或静态类,最后注册的实现可替换之前的

安卓 andriod 4.2 html5 video标签loop属性不循环播放的问题

给威海税务大厅调整试电视机顶盒APP时,APP里面是一个HTML5网页,遇到HMLT5无法循环播放视频的问题。经过上网查资料,发现andriod4.2确实会存在这个问题,解决的办法就是不用loop属性,使用Js来控制循环播放。
代码如下:

// 注意下面的代码是在jquery的 $(function(){    }); 里面执行的,也就是页面加载完成之后
var videoDom = $('#video-player'); // 使用Jquery获取video标签
var videofile = videoDom.attr('data');  // 获取video标签的data属性,这个data里面其实是要播放的文件
var video = document.getElementById('video-player'); //使用js获取video标签
video.addEventListener('ended', play); // 给video标签添加播放结束事件,事件函数是play()
play();   // 调用一次play开始播放

// 定义事件函数play
function play() {
    video.src = videofile; // 设置要播放的视频文件
    video.load();  // 加载视频,若视频很短,加载完后再播放,监听canplaythrough事件即可  
    video.play();   // 开始播放            
}   

附上从网上找到的代码:

<video autoplay="autoplay" id = "video" playsinline webkit-playsinline&gt;
   <source type="video/mp4" src="path" />
   <preference name="AllowInlineMediaPlayback" value="true" />
</video>
<script>
      var video = document.getElementById("video");
      video.loop = false;
      video.addEventListener('ended', function() {
      video.currentTime=0.1; video.play(); }, false);
      video.play();
  </script>

关于webview不能自动播放的问题,我在app的代码里进行解决了,代码如下:

// 在onCreate函数里调用
/*加上下面四行代码,可以让WebView里的video标签自动播放,(android4.5下测试通过)*/
int SDK_INT = android.os.Build.VERSION.SDK_INT;
if (SDK_INT > 16) {
	engine.getSettings().setMediaPlaybackRequiresUserGesture(false);  // 这段代码在模拟器上报错,要注释掉
}

根据查到的资料:
webView加载HTML可能出现包括autopaly loop等属性都不能用的情况,可以考虑用更强大的CrossWalk代替,不过会增加包的大小