在 Debian 12 上确定 Certbot 是否会自动续期

在 Debian 12 系统上,Certbot 通常会自动配置证书续期。您可以通过以下方法确认:

1. 检查 systemd 计时器

systemctl list-timers | grep certbot

正常情况下,您应该能看到 certbot.timer 被启用并计划在特定时间运行。

2. 检查 cron 配置

如果使用 cron 而不是 systemd:

cat /etc/cron.d/certbot

或查看当前用户的 crontab:

crontab -l | grep certbot

3. 执行模拟续期测试

sudo certbot renew --dry-run

这会模拟证书续期过程,确认一切配置正常。

4. 检查 Certbot 配置

cat /etc/letsencrypt/renewal/你的域名.conf

确认配置中有 renew_before_expiry 和 autorenew 相关设置。

5. 查看日志记录

sudo journalctl -u certbot

或

sudo cat /var/log/letsencrypt/letsencrypt.log

6. 查看证书信息

sudo certbot certificates

这将显示所有证书及其过期日期信息。

在 Debian 12 上,Certbot 默认会设置自动续期,通常通过 systemd timer 每天尝试续期(仅对即将到期的证书生效,通常是到期前 30 天)。

相关阅读:使用certbot自动获取SSL证书

构建docker出错:max depth exceeded

错误信息如下:

ERROR: failed to solve: failed to prepare cf9f3yt06q7scav6v9oiip1l0 as i3ft5qk817ms85wbfz25o430y: max depth exceeded
ERROR: Service 'web' failed to build : Build failed

解决办法:

首先,尝试清理 Docker 系统:

sudo docker system prune -a

2. 重启 Docker 守护进程

sudo systemctl restart docker

3、执行sudo docker-compose up -d --build重新构建,问题解决!

使用certbot自动获取SSL证书

Certbot 是一个由 EFF(Electronic Frontier Foundation) 推出的开源工具,用于自动从 Let’s Encrypt 获取免费 SSL/TLS 证书,并自动完成证书安装与续期。它极大地简化了为网站启用 HTTPS 的流程。

本文介绍在debian12上使用certbot。

sudo apt update
sudo apt install certbot

sudo docker-compose down  # 停止容器以释放80端口

sudo certbot certonly --standalone -d notes.wujie.me

# 获取证书后,修改 docker-compose.yml 文件挂载新证书

修改 docker-compose.yml 配置

sudo vi docker-compose.yml

将证书挂载部分修改为:

volumes:
  - ../:/var/www/html
  - ./apache/site_host.conf:/etc/apache2/sites-available/000-default.conf
  # 使用 Let's Encrypt 证书
  - /etc/letsencrypt/live/notes.wujie.me/fullchain.pem:/etc/apache2/ssl/server.crt
  - /etc/letsencrypt/live/notes.wujie.me/privkey.pem:/etc/apache2/ssl/server.key

 确保证书可被访问

Let’s Encrypt 证书默认权限较严格,需要确保容器可以读取:

# 添加读取权限
sudo chmod -R 755 /etc/letsencrypt/live
sudo chmod -R 755 /etc/letsencrypt/archive

 更新 Apache 配置

您的 Apache 配置文件site_host.conf 已经正确配置了,不需要修改。它已经引用了:

SSLCertificateFile /etc/apache2/ssl/server.crt
SSLCertificateKeyFile /etc/apache2/ssl/server.key

这正是我们在 docker-compose.yml 中挂载 Let’s Encrypt 证书的位置。

重启 Docker 容器

# 停止当前容器
sudo docker-compose down
# 重新启动容器
sudo docker-compose up -d

自动续期

如果在安装完certbot时,看到Certbot has set up a scheduled task to automatically renew this certificate in the background.,就表示自动续期已经自动设置了。

但您还需要确保证书更新后重启 Docker 容器。创建一个续期钩子脚本:

sudo mkdir -p /etc/letsencrypt/renewal-hooks/post
sudo vi /etc/letsencrypt/renewal-hooks/post/restart-docker.sh

添加以下内容:

#!/bin/bash
cd /your-docker-file/path
docker-compose restart web

设置执行权限:

sudo chmod +x /etc/letsencrypt/renewal-hooks/post/restart-docker.sh

最后重启容器:

sudo docker-compose restart

相关阅读:在 Debian 12 上确定 Certbot 是否会自动续期
屏蔽wordpress后台的自动升级失败提示信息

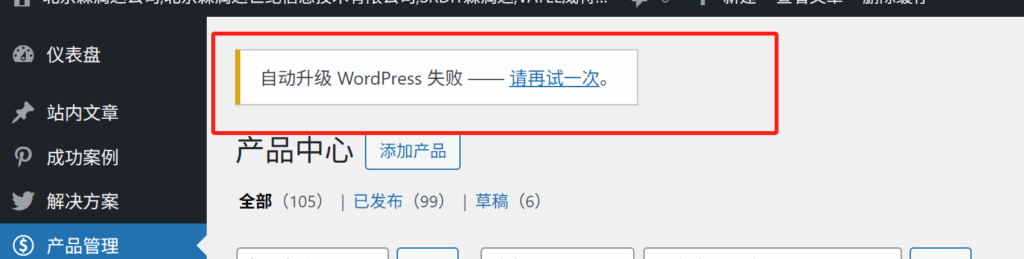
今天打开给客户做的一个wordpress网站时,发现网站后台出现了一行错误信息:自动升级 WordPress 失败 —— 请再试一次。如下图:

由于这个网站在开发时,为了不自动升级导致网站出问题,所以禁用了wordpress的自动升级功能,所以才会出现这个警告。

那么,怎么办呢?肯定不能把禁用自动升级的代码移除掉,那样就破坏了初衷了,再说如果移除掉自动升级代码,wordpress自动升级导致和环境不兼容,网站出错,那才麻烦。

所以,还是继续堆屎山,想办法把这个提示信息屏蔽掉。

通过F12查看这个提示的CSS类是notice-warning,那么只要使用CSS把它隐藏掉就好了。说干就干,直接上代码:

add_filter('pre_site_transient_update_core', function ($value) {
    if (isset($value->last_checked)) {
        // 模拟移除错误(不推荐修改核心,直接清空错误提示)
        unset($value->updates);
    }
    return $value;
});

add_action('admin_head', function () {
    echo '<style>
        .notice.notice-error, 
        .update-nag,
        .notice.notice-warning {
            display: none !important;
        }
    </style>';
});

把这段代码放到functions.php里面,刷新后台,提示消失!问题搞定!收工!

华为云debian12服务器更新系统报错

错误信息:

E: Failed to fetch https://packages.sury.org/php/pool/main/p/php-defaults/php-common_96%2b0%7e20250402.56%2bdebian12%7e1.gbp84a5b7_all.deb  Temporary failure resolving 'packages.sury.org'
E: Failed to fetch https://packages.sury.org/php/pool/main/p/php8.3/php8.3-bcmath_8.3.20-4%2b0%7e20250414.61%2bdebian12%7e1.gbp1029c4_amd64.deb  Could not connect to packages.sury.org:443 (151.101.111.52), connection timed out
E: Failed to fetch https://packages.sury.org/php/pool/main/p/php8.3/php8.3-zip_8.3.20-4%2b0%7e20250414.61%2bdebian12%7e1.gbp1029c4_amd64.deb  Unable to connect to packages.sury.org:https:
E: Failed to fetch https://packages.sury.org/php/pool/main/p/php8.3/php8.3-xml_8.3.20-4%2b0%7e20250414.61%2bdebian12%7e1.gbp1029c4_amd64.deb  Unable to connect to packages.sury.org:https:
E: Failed to fetch https://packages.sury.org/php/pool/main/p/php8.3/php8.3-readline_8.3.20-4%2b0%7e20250414.61%2bdebian12%7e1.gbp1029c4_amd64.deb  Unable to connect to packages.sury.org:https:
E: Failed to fetch https://packages.sury.org/php/pool/main/p/php8.3/php8.3-opcache_8.3.20-4%2b0%7e20250414.61%2bdebian12%7e1.gbp1029c4_amd64.deb  Unable to connect to packages.sury.org:https:
E: Failed to fetch https://packages.sury.org/php/pool/main/p/php8.3/php8.3-mysql_8.3.20-4%2b0%7e20250414.61%2bdebian12%7e1.gbp1029c4_amd64.deb  Unable to connect to packages.sury.org:https:
E: Failed to fetch https://packages.sury.org/php/pool/main/p/php8.3/php8.3-mbstring_8.3.20-4%2b0%7e20250414.61%2bdebian12%7e1.gbp1029c4_amd64.deb  Unable to connect to packages.sury.org:https:
E: Failed to fetch https://packages.sury.org/php/pool/main/p/php8.3/php8.3-intl_8.3.20-4%2b0%7e20250414.61%2bdebian12%7e1.gbp1029c4_amd64.deb  Unable to connect to packages.sury.org:https:
E: Failed to fetch https://packages.sury.org/php/pool/main/p/php8.3/php8.3-gd_8.3.20-4%2b0%7e20250414.61%2bdebian12%7e1.gbp1029c4_amd64.deb  Unable to connect to packages.sury.org:https:
E: Failed to fetch https://packages.sury.org/php/pool/main/p/php8.3/php8.3-cli_8.3.20-4%2b0%7e20250414.61%2bdebian12%7e1.gbp1029c4_amd64.deb  Unable to connect to packages.sury.org:https:
E: Failed to fetch https://packages.sury.org/php/pool/main/p/php8.3/php8.3-fpm_8.3.20-4%2b0%7e20250414.61%2bdebian12%7e1.gbp1029c4_amd64.deb  Unable to connect to packages.sury.org:https:
E: Failed to fetch https://packages.sury.org/php/pool/main/p/php8.3/php8.3-curl_8.3.20-4%2b0%7e20250414.61%2bdebian12%7e1.gbp1029c4_amd64.deb  Unable to connect to packages.sury.org:https:
E: Failed to fetch https://packages.sury.org/php/pool/main/p/php8.3/php8.3-common_8.3.20-4%2b0%7e20250414.61%2bdebian12%7e1.gbp1029c4_amd64.deb  Unable to connect to packages.sury.org:https:
E: Failed to fetch https://packages.sury.org/php/pool/main/p/php-imagick/php8.3-imagick_3.8.0%7erc2-3%2b0%7e20250408.50%2bdebian12%7e1.gbpd16435_amd64.deb  Unable to connect to packages.sury.org:https:
E: Failed to fetch https://packages.sury.org/php/pool/main/d/debsuryorg-archive-keyring/debsuryorg-archive-keyring_2025.03.13_all.deb  Unable to connect to packages.sury.org:https:
E: Unable to fetch some archives, maybe run apt-get update or try with --fix-missing?
错误信息截图

问题分析:

这个错误说明 Debian 12 在更新或安装 PHP 包时,无法连接到 packages.sury.org。这是 PHP 的一个常用第三方源(由 Ondřej Surý 提供),经常用于安装更新版本的 PHP。但现在遇到了类似 DNS 解析失败或连接超时的问题。

解决办法:

出现这个问题的原因,大概率是因为packages.sury.org在国内访问不畅,可以使用以下方法尝试解决:

尝试切换服务器DNS,执行/etc/resolv.conf,添加以下内容:

nameserver 8.8.8.8
nameserver 1.1.1.1

然后再执行:

sudo apt update
sudo apt upgrade

如果还是不能解决,可以那么只能挂代码,或者切换源,不过 sury.org 很少有完整镜像,可能需要手动下载 .deb 包安装。

最后如果都无法解决,可以暂时注释掉 Sury 源。

我是通过修改DNS解决的问题。

debian 清理内核

1、查看已安装的内核:

dpkg --list | grep linux-image

输出类似于:

root@localhost:~# dpkg --list | grep linux-image
rc  linux-image-5.10.0-15-amd64    5.10.120-1                                     amd64        Linux 5.10 for 64-bit PCs (signed)
rc  linux-image-5.10.0-16-amd64    5.10.127-2                                     amd64        Linux 5.10 for 64-bit PCs (signed)
rc  linux-image-5.10.0-17-amd64    5.10.136-1                                     amd64        Linux 5.10 for 64-bit PCs (signed)
rc  linux-image-5.10.0-19-amd64    5.10.149-2                                     amd64        Linux 5.10 for 64-bit PCs (signed)
rc  linux-image-5.10.0-20-amd64    5.10.158-2                                     amd64        Linux 5.10 for 64-bit PCs (signed)
rc  linux-image-5.10.0-21-amd64    5.10.162-1                                     amd64        Linux 5.10 for 64-bit PCs (signed)
rc  linux-image-5.10.0-22-amd64    5.10.178-3                                     amd64        Linux 5.10 for 64-bit PCs (signed)
rc  linux-image-5.10.0-23-amd64    5.10.179-3                                     amd64        Linux 5.10 for 64-bit PCs (signed)
rc  linux-image-5.10.0-24-amd64    5.10.179-5                                     amd64        Linux 5.10 for 64-bit PCs (signed)
rc  linux-image-5.10.0-26-amd64    5.10.197-1                                     amd64        Linux 5.10 for 64-bit PCs (signed)
rc  linux-image-5.10.0-27-amd64    5.10.205-2                                     amd64        Linux 5.10 for 64-bit PCs (signed)
rc  linux-image-5.10.0-8-amd64     5.10.46-5                                      amd64        Linux 5.10 for 64-bit PCs (signed)
rc  linux-image-6.1.0-17-amd64     6.1.69-1                                       amd64        Linux 6.1 for 64-bit PCs (signed)
rc  linux-image-6.1.0-18-amd64     6.1.76-1                                       amd64        Linux 6.1 for 64-bit PCs (signed)
rc  linux-image-6.1.0-20-amd64     6.1.85-1                                       amd64        Linux 6.1 for 64-bit PCs (signed)
rc  linux-image-6.1.0-21-amd64     6.1.90-1                                       amd64        Linux 6.1 for 64-bit PCs (signed)
rc  linux-image-6.1.0-22-amd64     6.1.94-1                                       amd64        Linux 6.1 for 64-bit PCs (signed)
rc  linux-image-6.1.0-23-amd64     6.1.99-1                                       amd64        Linux 6.1 for 64-bit PCs (signed)
rc  linux-image-6.1.0-25-amd64     6.1.106-3                                      amd64        Linux 6.1 for 64-bit PCs (signed)
rc  linux-image-6.1.0-26-amd64     6.1.112-1                                      amd64        Linux 6.1 for 64-bit PCs (signed)
rc  linux-image-6.1.0-27-amd64     6.1.115-1                                      amd64        Linux 6.1 for 64-bit PCs (signed)
ii  linux-image-6.1.0-28-amd64     6.1.119-1                                      amd64        Linux 6.1 for 64-bit PCs (signed)
ii  linux-image-6.1.0-33-amd64     6.1.133-1                                      amd64        Linux 6.1 for 64-bit PCs (signed)
ii  linux-image-amd64              6.1.133-1                                      amd64        Linux for 64-bit PCs (meta-package)

标记 ii表示已安装
​标记 rc表示已卸载但残留配置

2、确定当前已安装的内核:

uname -r

3、如果使用的不是最新的内核,需要重启应用新内核:

sudo reboot

4、清理内核:

sudo apt autoremove --purge

5、清理rc状态的内核:

sudo apt purge $(dpkg --list | grep '^rc' | awk '{print $2}')

清理后内核列表如下:

root@localhost:~# dpkg --list | grep linux-image
ii  linux-image-6.1.0-28-amd64     6.1.119-1                                      amd64        Linux 6.1 for 64-bit PCs (signed)
ii  linux-image-6.1.0-33-amd64     6.1.133-1                                      amd64        Linux 6.1 for 64-bit PCs (signed)
ii  linux-image-amd64              6.1.133-1                                      amd64        Linux for 64-bit PCs (meta-package)

注意:系统会自动保留一个旧内核作为回退,不要强制删除。

Debian 12 包安全机制变更简述

Debian 12 包安全机制变更简述

在新版本 Debian 12 (Bookworm) 中,安全签名验证机制有了一些重要的改进,目的是提高包管理的安全性,避免设备因为不可靠源而遭到渗透。

主要的变更包括:

1. 静态 keyring 文件

以前,系统通过 /etc/apt/trusted.gpg 和 /etc/apt/trusted.gpg.d/中的可信签名密钥来校验所有包源,但这种方式存在风险,文件权限过于宽松,可能被权限高的进程修改,而且对全部包源通用,有很大的风险面。

在 Debian 12 里,每个 APT 包源建议都使用独立的 keyring,并通过 sources.list或 .list 文件中的 signed-by 参数指定,如:

deb [signed-by=/usr/share/keyrings/deb.sury.org-php.gpg] https://packages.sury.org/php/ bookworm main

这种写法可以确保:

  • 仅仅信任指定源,避免全局性影响
  • 便于维护和检查,提高安全性

2. 公钥管理方式改变

对于新添包源,得自行下载并存放公钥(而不再是直接 apt-key add),如:

wget -O /usr/share/keyrings/deb.sury.org-php.gpg https://packages.sury.org/php/apt.gpg

这种做法是更安全的,避免未来 apt-key 废弃后造成乱。

3. 实际环境中的关键问题

实际使用过程中,如果包源没有按要求指定 signed-by,而又缺少对应公钥,就会出现类似:

The following signatures couldn't be verified because the public key is not available: NO_PUBKEY B188E2B695BD4743

遇到这种错误,需要按照源网站提供的方式下载公钥,且放至正确的 keyrings 目录,然后重新扫描系统:

sudo apt update

总结

Debian 12 安全机制的改进,令包管理更加井井有条,就是多了一些初始配置工作,但也为全体系统的安全性打下了更坚实的基础。

在最近有设备升级到 Debian 12 或者添加了第三方包源时,记得检查 signed-by配置,并确保 keyring 是最新版本!

WordPress 网站支持多域名

正常情况下,一个 wordpress 网站只能支持使用在后台配置的域名,如果绑定了多个域名,点击会跳转到后台设置的那个域名。

但有时我们的网站可能需要同时使用多个域名,对于这个需求,我们有两种办法可以做到,一是使用插件,例如 WP Multidomain 和 Domain Mapping System ;第二种方法是小改wp-config.php文件,这种方法简单可控,并且不拖慢系统速度。具体操作如下:

找到你的 wp-config.php,在文件中加入下面这段:

// 在 wp-config.php 添加,让 WordPress 根据访问域名动态确定 URL
if (isset($_SERVER['HTTP_HOST'])) {
    $http_host = $_SERVER['HTTP_HOST'];
    define('WP_HOME', 'https://' . $http_host);
    define('WP_SITEURL', 'https://' . $http_host);
}

放在靠近 /* That's all, stop editing! Happy publishing. */ 上面就可以了。

这样,无论是 aaa.com、bbb.com,WordPress都会以当前访问的域名作为站点 URL,不会强制跳转,也不会出错。

注意事项

  • 这适合 多个域名访问同一内容 的场景。
  • 如果你要在不同域名下显示不同内容(比如 LOGO不同、文章不同),还要额外加逻辑判断。
  • 服务器(Nginx / Apache)那边,记得把所有域名都绑定到同一个目录。
  • SSL 证书(HTTPS)要支持所有域名。可以用通配符证书或者给每个域名申请单独证书。

Windows的.bat文件和.cmd文件区别

.bat和.cmd都是Windows批处理文件,但它们有一些重要区别:

.bat文件

  • 起源于MS-DOS时代,是传统的批处理文件格式
  • 可在所有Windows版本上运行,兼容性更好
  • 在COMMAND.COM环境中执行
  • 功能相对基础

.cmd文件

  • Windows NT系列引入的批处理文件格式(Windows XP及以上)
  • 在CMD.EXE环境中执行
  • 提供更好的错误处理和环境变量扩展
  • 有更多高级功能和改进的命令处理

实际使用中的区别

  • 在现代Windows系统中(Windows 10/11),两者差异不大
  • .cmd文件在处理变量扩展和错误级别时更可靠
  • .cmd文件支持延迟环境变量扩展等高级特性
